Plastic Scm Code Reviews Add Notes to Added Files
Version command integrations
Unity has integrations with two version control systems: PerforceA version control organisation for file change direction. More than info
See in Glossary and Plastic SCM. To employ the version control integrations in Unity, you need to have either a Perforce or Plastic SCM server gear up upward for your Unity Projection.
Setting up version control in Unity
Open a Unity Project, go to Edit > Project Settings, and so select the Editor category.
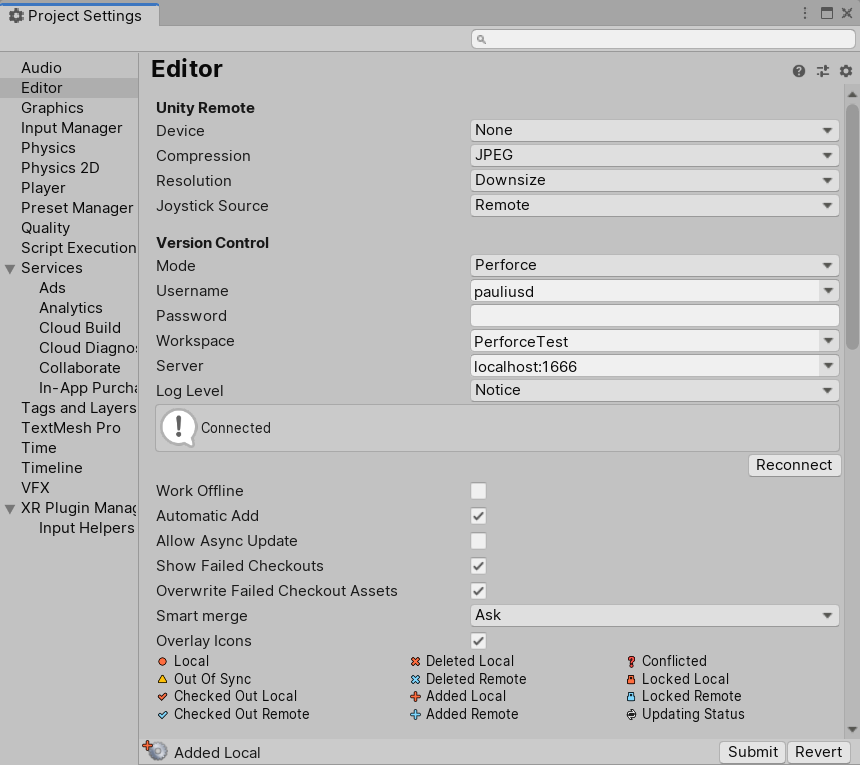
Nether Version Command A arrangement for managing file changes. You can utilize Unity in conjunction with most common version control tools, including Perforce, Git, Mercurial and PlasticSCM. More info
Run across in Glossary there are the following settings:
| Property | Function | |
|---|---|---|
| Mode | Select the version control manner. | |
| Hidden meta files | Hides the .meta files in your operating system'due south file explorer. Unity does not testify .meta files in the Project view, no matter which mode you choose. | |
| Visible meta files | Select this option to piece of work with a version control system that Unity doesn't back up. This is the default setting. You tin can so manage the source Assets and metadata for those Assets with a version command system of your choice. For more than information, see documentation on External Version Control Systems. | |
| Perforce | Select this option if you employ Perforce equally your version control system. | |
| Plastic SCM | Select this choice if yous use Plastic SCM as your version control system. | |
| Username (Perforce merely) | Enter the username associated with your Perforce account. | |
| Password (Perforce only) | Enter the password associated with your Perforce business relationship. | |
| Workspace (Perforce only) | Enter your workspace (for example, Example_Workspace_1). | |
| Server (Perforce but) | Enter the server your Unity Project is on (for case, localhost:1666). | |
| Host In a multiplayer network game without a dedicated server, ane of the peers in the game acts as the heart of authority for the game. This peer is chosen the "host". It runs a server and a "local client", while the other peers each run a "remote customer". More info See in Glossary (Perforce only) | Enter the hostname that your computer should impersonate (for instance, workstation123.perforce.com) | |
| Log Level | Select how much version control data to receive in Unity's console log. | |
| Verbose | Unity logs every performance related to version control. This selection provides very detailed logging, and is useful if you want to debug your version control setup. | |
| Info | Unity logs errors, warnings, and information related to version control. | |
| Notice | Unity logs errors and warnings. | |
| Fatal | Unity prints only fatal errors to the console. | |
| Status | Displays information on the status of the connection to the version control system. If yous are not connected, select Connect to connect to the system you accept configured. | |
| Automatic Add | When this setting is enabled, Unity automatically adds your files to the version control system when you add them to the Project, either via the Editor or the folder on disk. When this setting is disabled, you need to add files manually to the version command system. This setting is enabled by default. | |
| Work Offline (Perforce just) | Enable this setting to work offline. When this setting is enabled, you need to reconcile offline work in P4V or use the reconcile command in P4 to bring the Perforce server depot up to date with the work you did while offline. For more information, encounter Working offline with Perforce | |
| Allow Async Update (Perforce just) | Enable this setting to utilize asynchronous version control status queries. When enabled, Perforce updates the version command status of files without stalling the Unity Editor. Utilise this setting when the connection to your version control server has high latency. Note: Only status queries are asynchronous. Unity synchronously performs operations that change the state of files, or require up-to-date cognition of a file status. | |
| Evidence Failed Checkouts (Perforce only) | Enable this property to show a dialog when Perforce tin't perform the cheque out operation. This might happen if you lot lose connection, or if some other user has exclusively checked out the Asset you want to edit. | |
| Overwrite Failed Checkout Assets (Perforce just) | When you lot enable this setting, Unity saves any Assets that can not be checked out. This means Unity forces through a save to a file, even if Perforce cannot check out the file. This is enabled past default. If yous disable it, Unity doesn't force your files to relieve if Perforce can't check them out. | |
| Overlay Icons | Enable this setting to display version command condition icons in the Editor. | |
| Smart Merge | Smart Merge makes information technology easier for Unity to merge files that take changes on the same line. This is useful if several users are working on the same Projection at the aforementioned time. | |
| Off | Disable Smart Merge. | |
| Enquire | Enable Smart Merge, but receive a notification before you lot merge, if a conflict happens. This is the default setting. | |
| Premerge | Automatically employ Smart Merge. | |
Configure the Version Control settings, then select the Connect push button next to the status area to connect to the version control system. When Unity connects to the organization, Connected displays in the condition expanse.
To arrange your revision control tool, open Preferences so select the External Tools department. You can choose a new tool under Revision Control Diff/Merge.
Using version control in Unity
When you prepare the Editor upwards to work with your version command system, you lot can perform version control operations via the Editor, instead of in the version command client. To do this, right-click on the Nugget in the Project view.
The version control operations vary depending on which version control you use. The following tabular array displays what actions are available for each version control:
| Version control operation | Description | Perforce | Plastic SCM |
|---|---|---|---|
| Get Latest | This updates the files on your machine to friction match those in the version control system. | Yes | No. To become the latest changes and update the file, yous need to utilise the version control window (Window > Asset Management > Version Control). |
| Submit | Submits the current state of the files to the version control system. | Yes | Yes |
| Check Out | Allows changes to be made to the files. | Yes | Aye |
| Check Out (Other) | Select whether to check out both the Asset and its .meta file, or only the Asset, or only the .meta file. | Yep | No |
| Mark Add | Adds the files into version command. | Yes | Yeah |
| Revert | Discards changes to open changed files. | Aye | Aye |
| Revert Unchanged | Removes the checked out condition from files that take previously been checked out but you lot haven't modified. | Yes | Yes |
| Resolve Conflicts | Resolves conflicts on files that have been changed past multiple users. | Yes | No. Conflicts appear in the version control menu, simply you need to resolve them in the Plastic SCM GUI. |
| Lock | Prevents other users from submitting changes to the files. | Yep | No. To lock or unlock files in Plastic SCM, you must edit a specific Plastic SCM lock file externally. For more than information, see the page on Plastic SCM Integration. |
| Unlock | Releases the lock and allows anyone to submit changes. | Aye | No. To lock or unlock files in Plastic SCM, you must edit a specific Plastic SCM lock file externally. For more data, meet the page on Plastic SCM Integration. |
| Diff | Compares the differences betwixt the local files on your computer and the files on the server. You can cull to unequal but the Asset file, or the Asset file and its .meta file. | Yes | Yes |
Checking out files
In some version control systems, such equally Perforce, versioned files are read-only by default, and require y'all to check them out before yous edit them (unless you have enabled the Work offline setting). When you work with versioned Assets from the Editor, the Inspector A Unity window that displays information about the currently selected GameObject, nugget or project settings, assuasive yous to inspect and edit the values. More info
Run across in Glossary displays a Check Out button that enables file editing. Additionally, Project Settings A broad collection of settings which allow yous to configure how Physics, Audio, Networking, Graphics, Input and many other areas of your project deport. More than info
Encounter in Glossary inspectors have a Checkout push button that y'all can use to cheque out specific Project settings.
If you accept custom Editor script lawmaking that disables parts of another custom editing tool for read-only Assets, or if you lot are writing to versioned files manually, employ the AssetDatabase.IsOpenForEdit and AssetDatabase.MakeEditable APIs to check for file editability and to perform check out operations.
The Version Control integration also exposes Provider.PreCheckoutCallback and Provider.PreSubmitCallback C# callbacks for custom version control operation validation logic.
Unity writes any Assets you change or mark as modified in the Editor to the disk when information technology performs a Save Project operation. The Assets are and so checked out in version control if needed. This might lead to Assets getting checked out even if no actual changes to the file happens. This most often happens when an Editor script calls EditorUtility.SetDirty on an Nugget, without checking if it was modified.
Note: If Unity cannot commit your changes to your version command client (for example, if the server is down or if license bug occur), information technology stores your changes in a split changeset.
When yous relieve your changes to a . scene A Scene contains the environments and menus of your game. Think of each unique Scene file as a unique level. In each Scene, you lot place your environments, obstacles, and decorations, essentially designing and edifice your game in pieces. More than info
See in Glossary file, Unity automatically checks information technology out. If you utilise Plastic SCM, it also automatically checks out automatically generated Assets, such as calorie-free maps.
Version Control window
You can use the Version Command window to view the files in your changelist. To access the window navigate to Window > Nugget Management > Version Control.
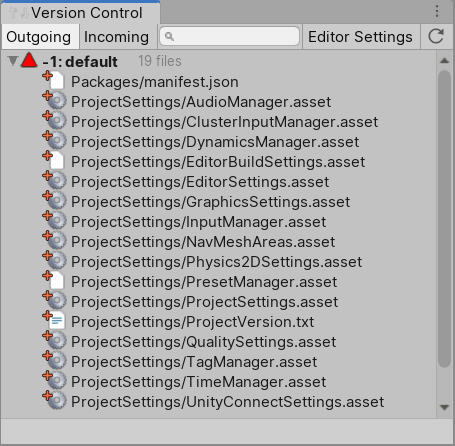
The Outgoing tab lists all of the local changes that are pending a commit into version command. The Incoming tab lists all of the changes that demand to be pulled from version control.
Right-click Assets or changelists in the window to perform operations on them. To move Assets between changelists, drag them from 1 changelist to the header of the target changelist.
Icons
The Editor displays the post-obit icons to visualize the version control status for files and Assets:
| Icon | Purpose |
|---|---|
 | File added locally, and pending addition into version control. |
 | File added to version control by another user, and pending addition into version control. |
 | File is checked out locally. |
 | File is checked out by another user remotely. |
 | There has been a conflict merging this file and information technology needs to be resolved. |
 | File has been deleted locally, and is pending deletion in version control. |
 | File has been deleted by another user and is pending deletion in version command. |
 | File is not withal under version control. You can use the Mark Add operation to add together the file manually. |
 | File is locked by you and other users cannot change information technology. |
 | File is locked by another user and you cannot modify it. |
 | Some other user has checked in a new version of this file. Employ the Utilise Incoming Changes functioning to get the latest version. |
 | The server is requesting the version control condition of this file, or is waiting for a response. This only appears if you use a centralized version command organisation like Perforce. |
Source: https://docs.unity3d.com/Manual/Versioncontrolintegration.html
0 Response to "Plastic Scm Code Reviews Add Notes to Added Files"
Post a Comment